The tricks in this tutorial are things that you could do to any tote bag or purse to give it a little touch of you. I got the tote bag here in the dollar section at Target. That section of the store just sucks the money right out of my purse. I promise I hear the sound of an industrialized vacuum being switched on as soon as I walk in the door and then there I zoom right to the dollar bins! Well here we go!
So here's my bag and the first thing I wanted to do with it was put my niece's initial on the front. I have these large lowercase letters that I bought at a scrapbook store and they have come in handy for these types of projects where I need a pattern to trace. I used the sewable HeatnBond .
I followed the directions on the HeatnBond package and attached it to the back of my fabric.
I put my pattern down backwards on the paper and then...
traced around it with a pen. You want to do it backward so that it correct when you flip it over.
Then I cut out the letter and as you can see when flipped over it is facing the correct way.
Then I followed the directions again
for affixing the letter to the bag.
Here it is and it's stuck on their pretty well but I decided to stitch around it anyway.
I was going to do it by hand but then I decided to try a zigzag stitch using my sewing machine. I am sure it was still faster but I am slow doing this stitch as there were many turns. I think the hardest part was the round part of the "r".
Next, I wanted to make a fabric flower.
I used the ribbon holder to trace circles onto the fabric.
4 circles are needed for this type of flower.
Then I folded each circle in half and then in half again.
Right side of fabric facing out.
Put a little stitch in the bottom to keep the fabric folded together.
That's how they should look.
I decided to place the flower on one side at the top of the bag near the handle.
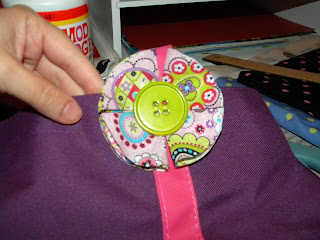
I lined up each fabric petal with a hole in the button and stitched it through the fabric and the button hole.
So once the petals were attached to the button then I sewed the button on to the bag.
Then I sewed on two more layers of buttons.
Large, medium and then smallest on top.
I think the flower turned out cute.
I hope my niece will like it! Caleb did!
Here are some other little purses that
I have been making for some other little girls I know. I love this owl print!


hi melissa..
ReplyDeletewhat a very cute idea! I love the bags....
greeting from croatia,europa:))......
M...
http://argopirgasto.blogspot.com/
HI Melissa,
ReplyDeleteLove these purses, they are great! Thanks for the reminder that Christmas is only 87 days away. My, where has the year gone??
Jane
That is so cute! Thanks for the tutorial!
ReplyDeleteI just found your blog through a Thursday Blog Hop! Have a great night.
Amanda @ www.nutritionistreviews.com
Every one of them turned out beautiful.
ReplyDeleteI am a new follower from Buzz on By Thursday. I would appreciate it if you could stop over and return the favor.
I am giving a Halloween Apron away to one of my followers 10/5. All you need to do is follow. Thanks Terry
I am also following you on networked blogs.
ReplyDeleteGreat and oh so cute!
ReplyDeletefollowing you back....thanks for stopping by my blog!
ReplyDelete